
Playtest Game MUIN: A Confederate Victory
This sample game (entitled: MUIN) demonstrates a Confederate victory. It was played by Garry Haggerty (Union) and Will Green (Confederate). Both Garry and Will have generously annotated their moves—usually written in the 1st person perspective—in order to give a little insight into what they each attempted to accomplish during their respective turns.
The CyberBoard referee game file for MUIN can be downloaded below (by readers who wish to review the game in detail):
In the interest of full disclosure, Will approached this game as a veteran playtester, while Garry took on the role of both playtester and developer during this game. (Gentlemen: Thank you both for taking the time and effort to play, as well as annotate, this game.)
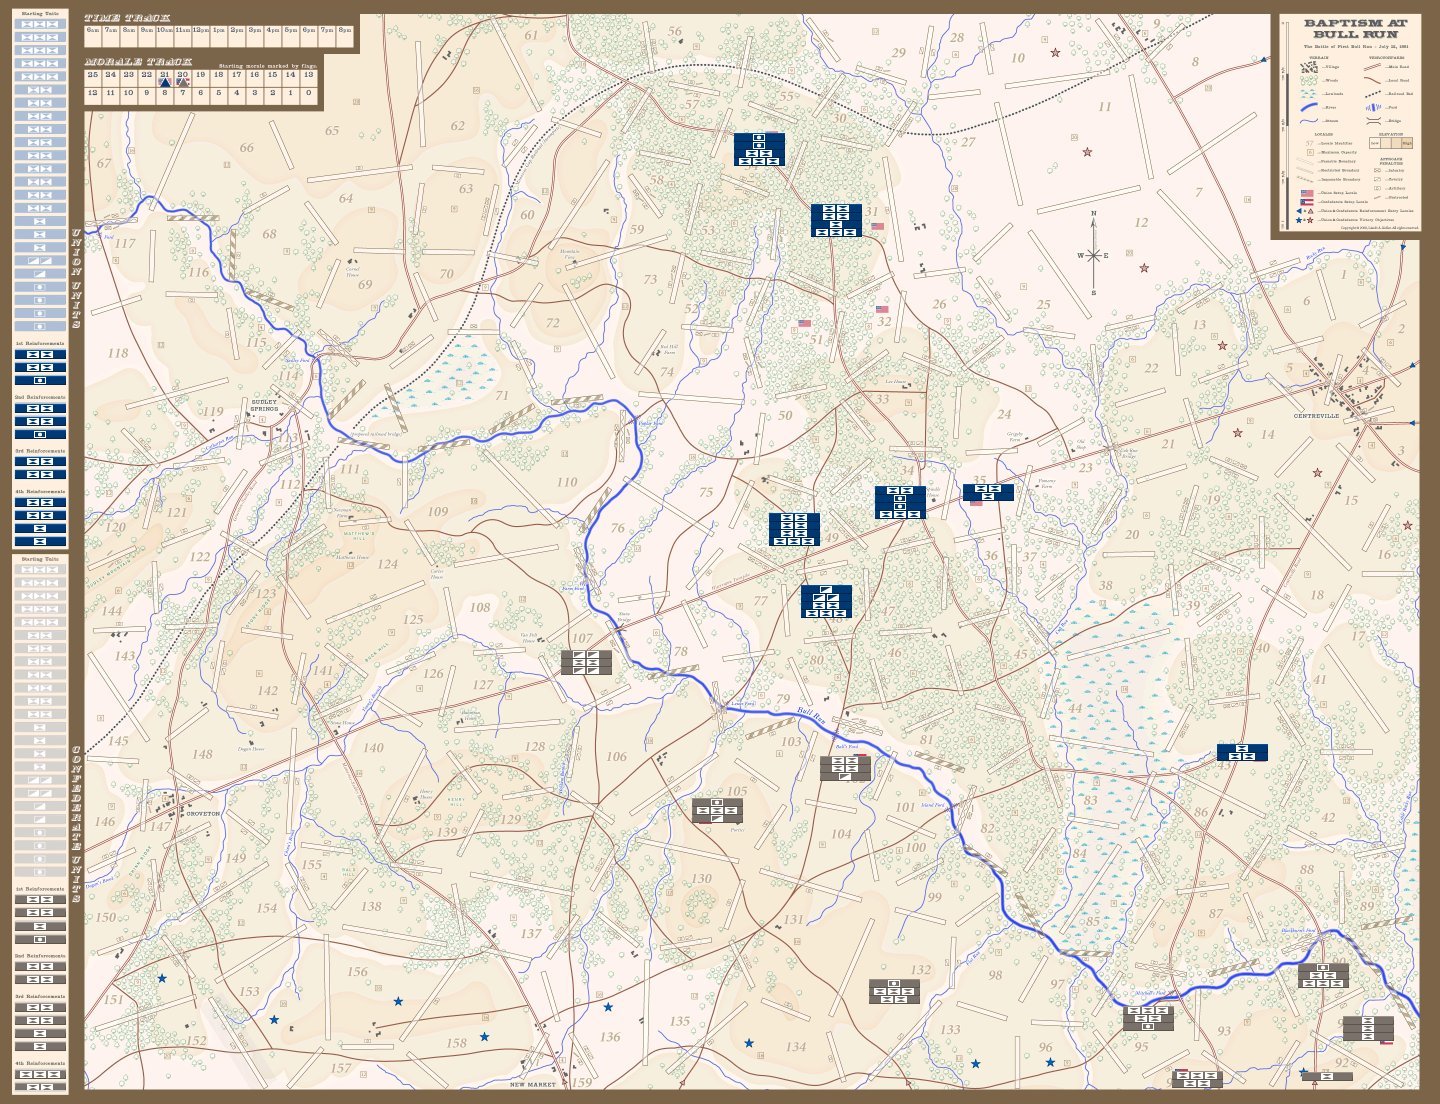
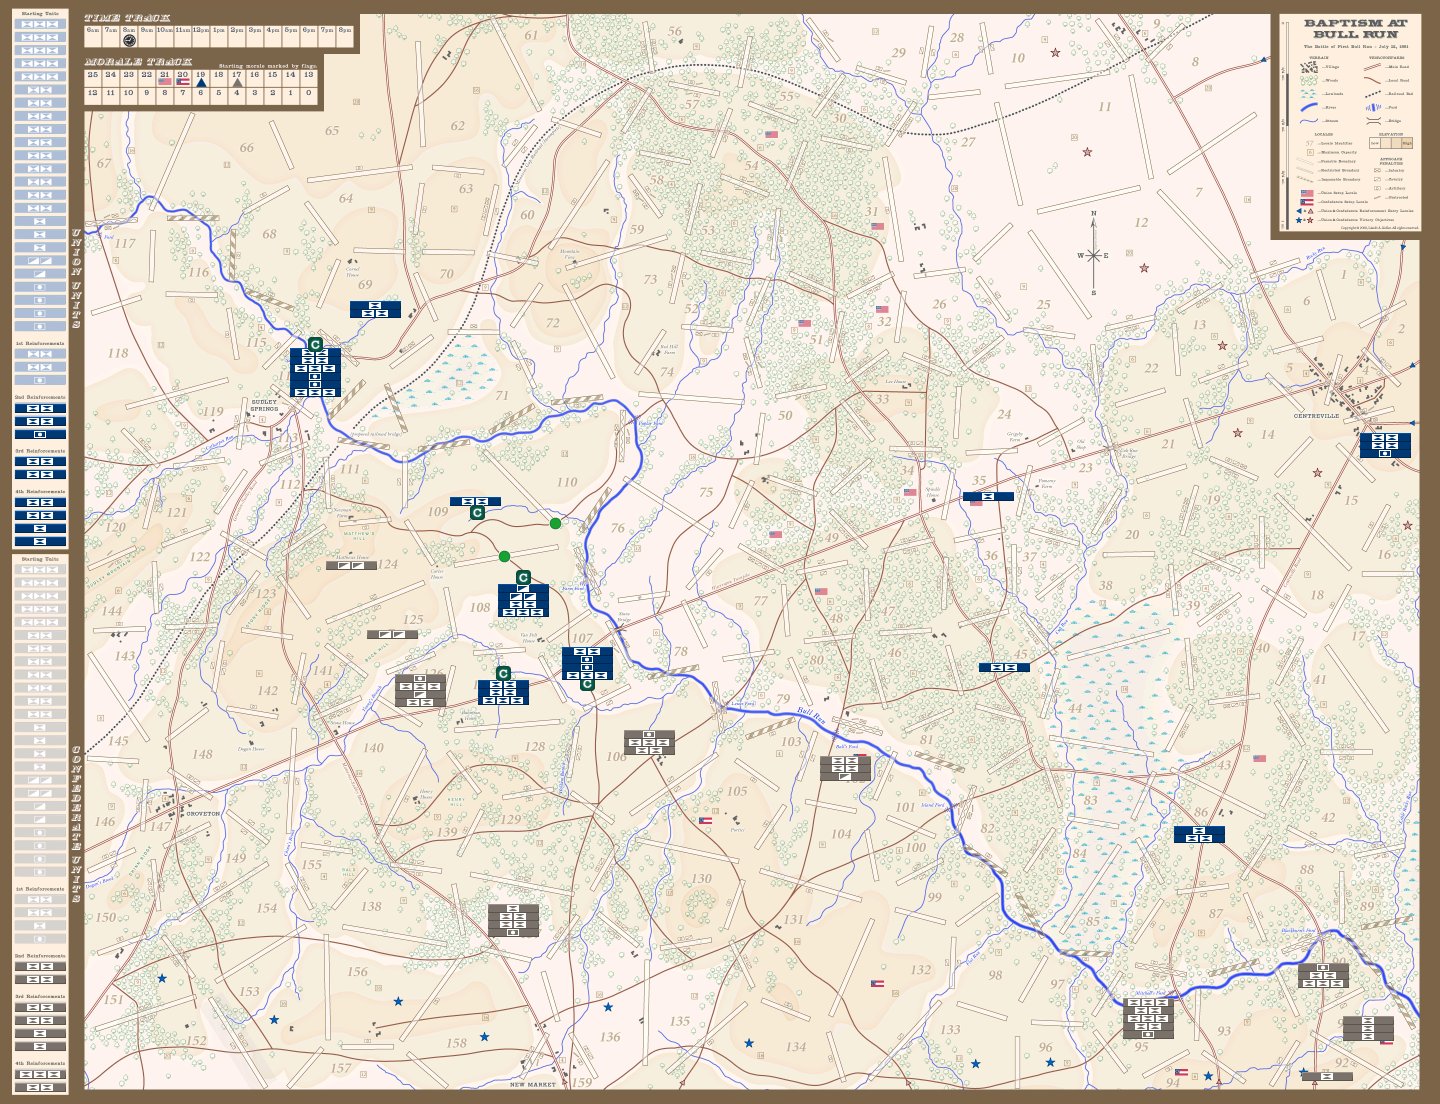
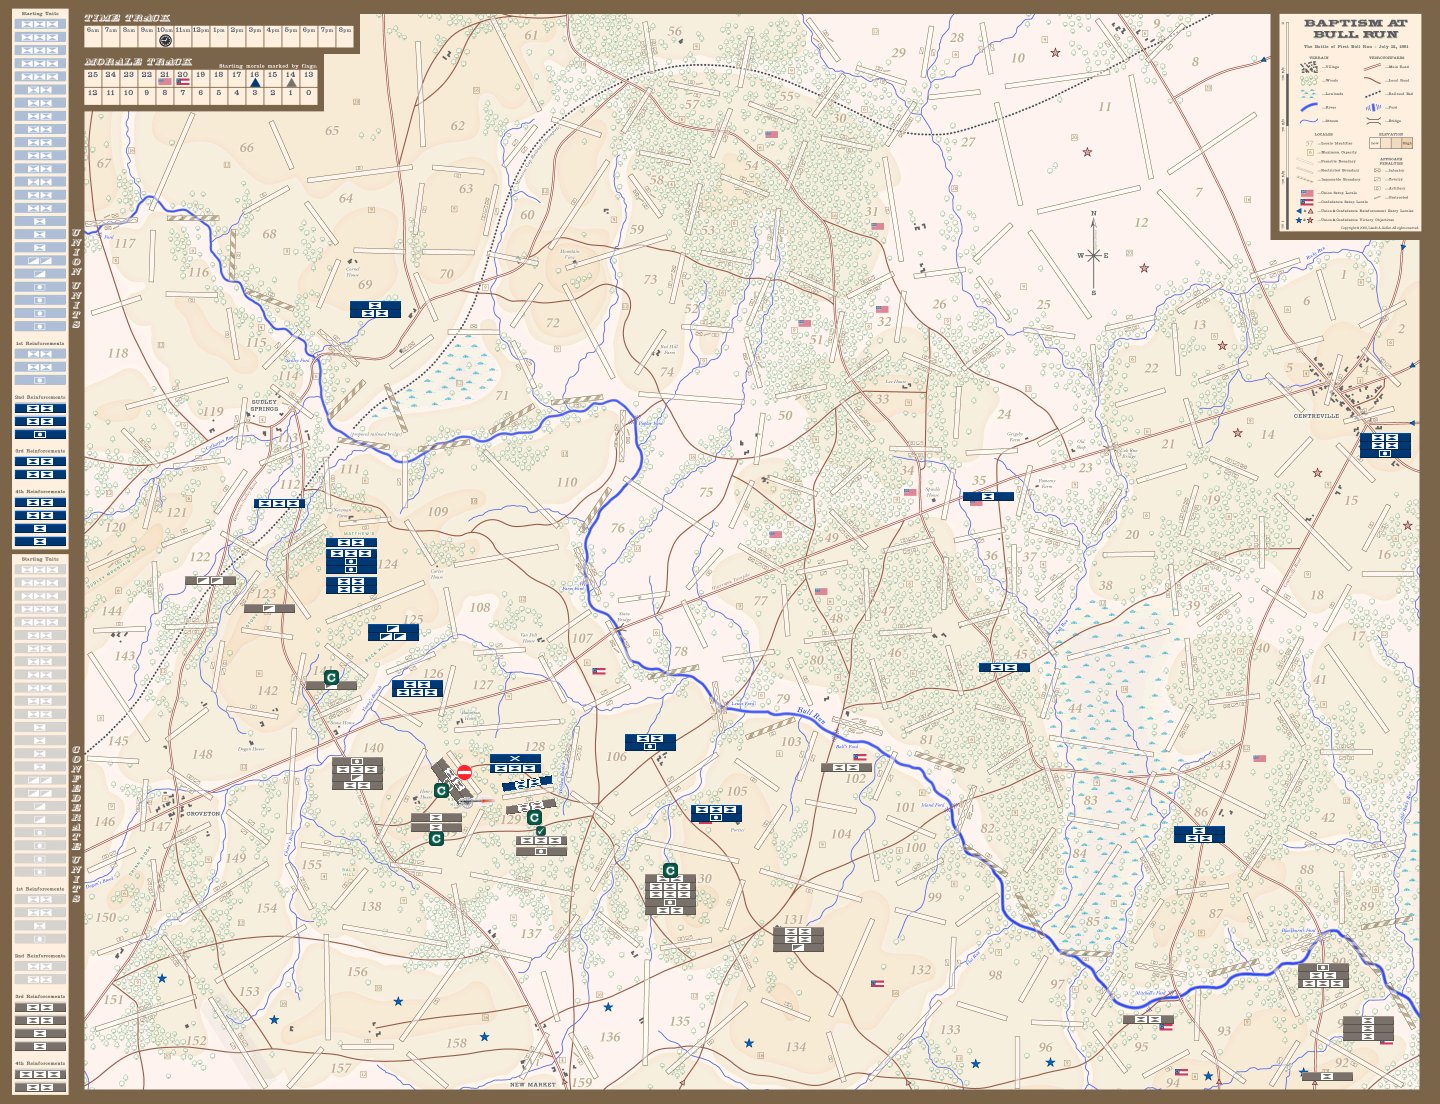
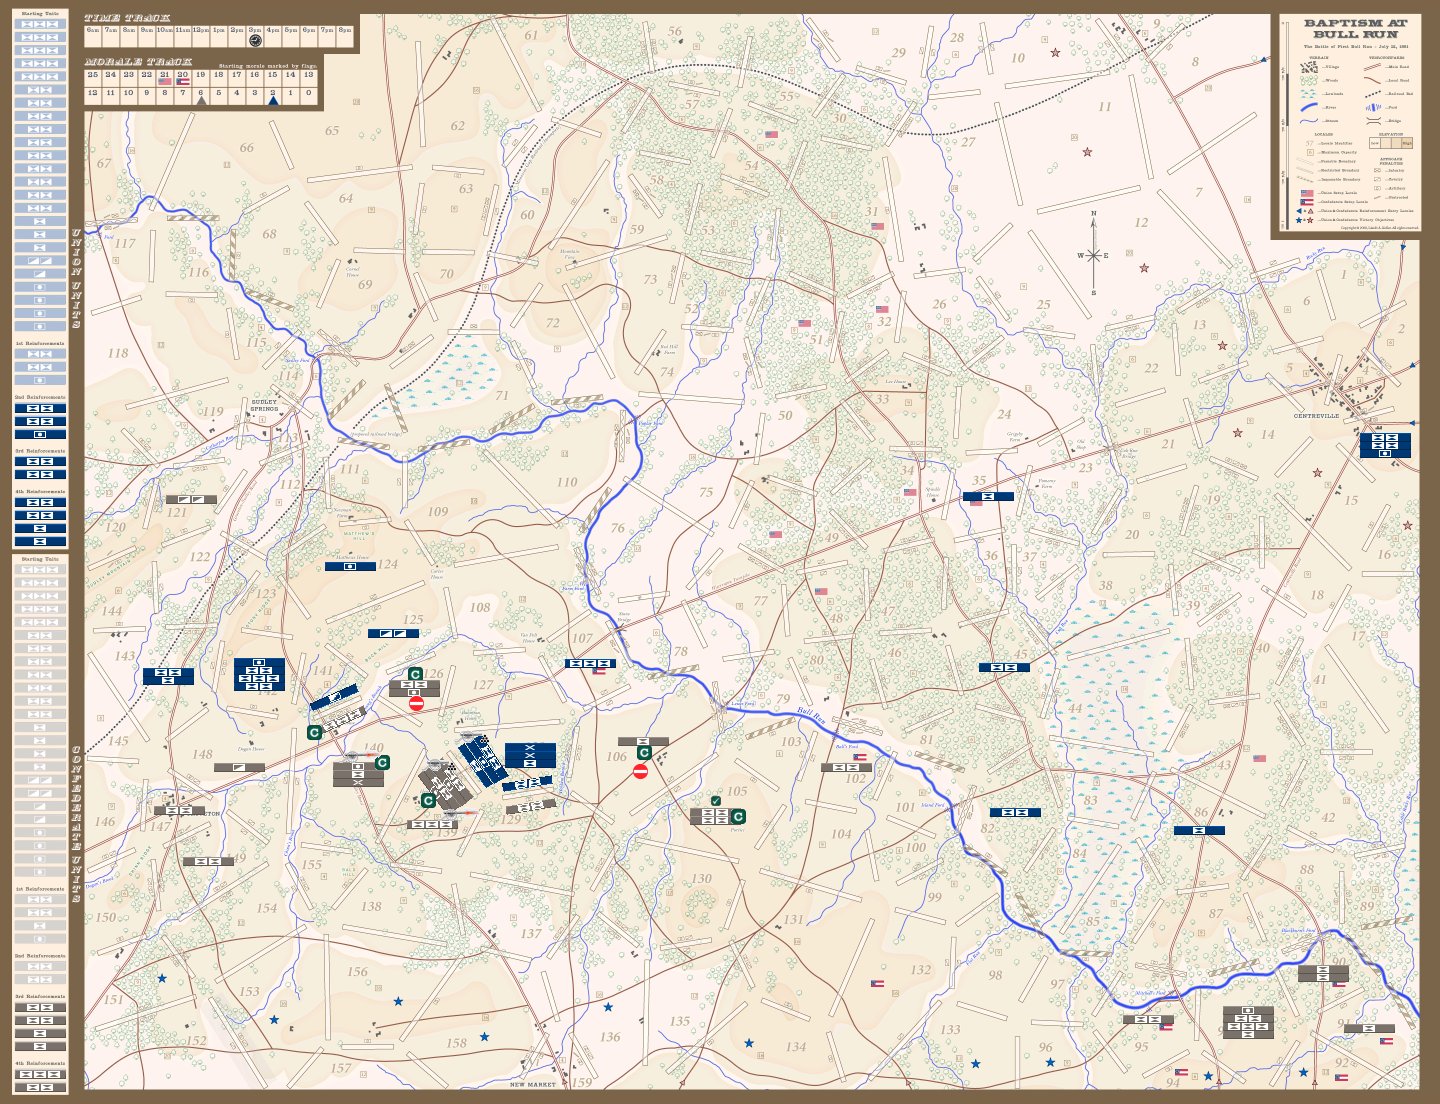
Union Setup
MUIN was a playtest of a deliberately extreme Union offensive strategy, to determine if such a strategy would prove to be an undesirable "ideal" US plan. As another game with the same goal (NION) played by Brian R. Mullin and Andy Wright had just started, László asked me to play MUIN parallel to NION—my deployment and operations would follow NION as far as possible.
The Union plan, devised for NION by Brian R. Mullin, commits almost all Union starting strength to the flanking action by the Union right, while minimal forces on the Union left screen Centreville. Any mobilized Union reinforcements will be restricted to countering Confederate moves toward their objectives near Centreville.
I fully expected a CSA offensive against Centreville to develop. My opponent, Will Green, plays an aggressive CSA game and I thought that starting only two Union units in 43 would be an irresistible provocation for such a response. I anticipated MUIN would play out as each army's strong right wing rushing its opponent's weak left wing, victory going to the side that most nimbly allocated its commands between the two "fronts." (My prediction was wrong in every operational detail. The only thing I got right was that Will would play an aggressive game.)
Confederate Setup
On this day I decided that, as the Confederate player, I wanted to focus on: Slowing the process of the Union flanking move at Sudley Springs, holding the Stone Bridge, and harassing the center, (if possible), while demonstrating, or possibly pushing with the Rebel right wing.
To that end, I wanted to make sure to have units, in place, allowing me to do so. Two 2-stength cavalry at 107, more than likely was overkill, yet having the option to break those 2's into two 1-strength cavalry units might open the game up in a glorious way. The random placement in 105 couldn't have been any better! This placement will allow the Stone Bridge to be fortified in a very strong manner.
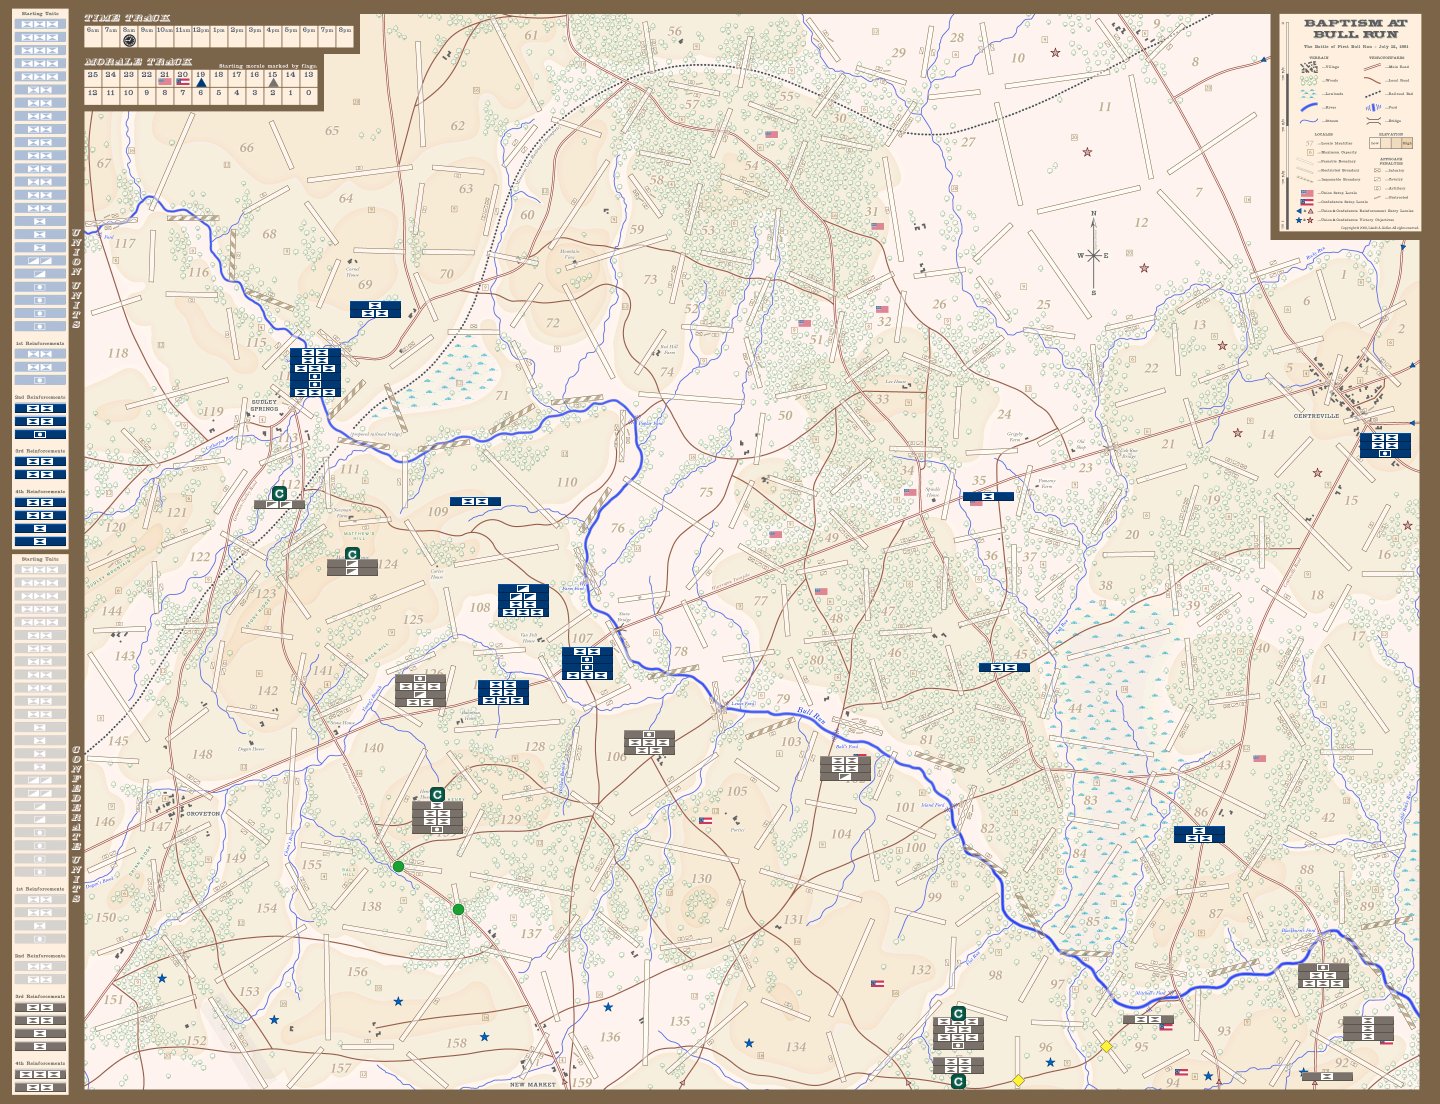
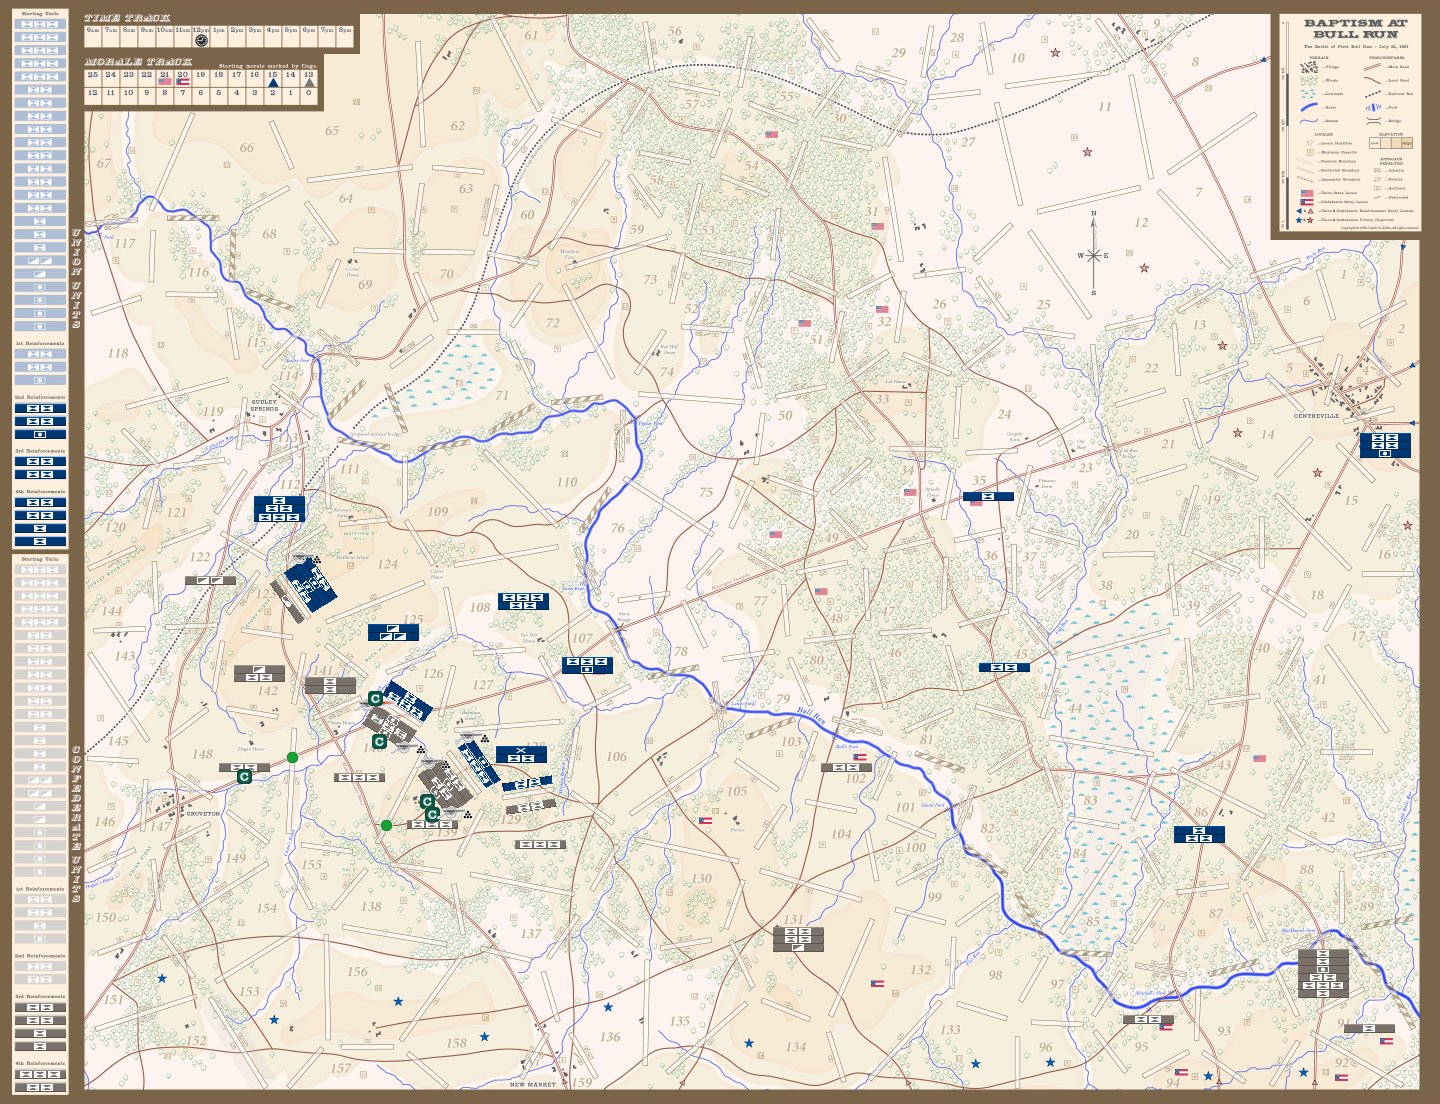
6am Union
Movement followed Brian's 6am exactly except that, having drawn three '1' cards, I was forced either to mobilize a reinforcement group one hour earlier than Brian did or to waste a command point (CP). I mobilized early. (As things turned out, it may have been better to waste the CP and keep the 2 morale points that mobilizing cost.)
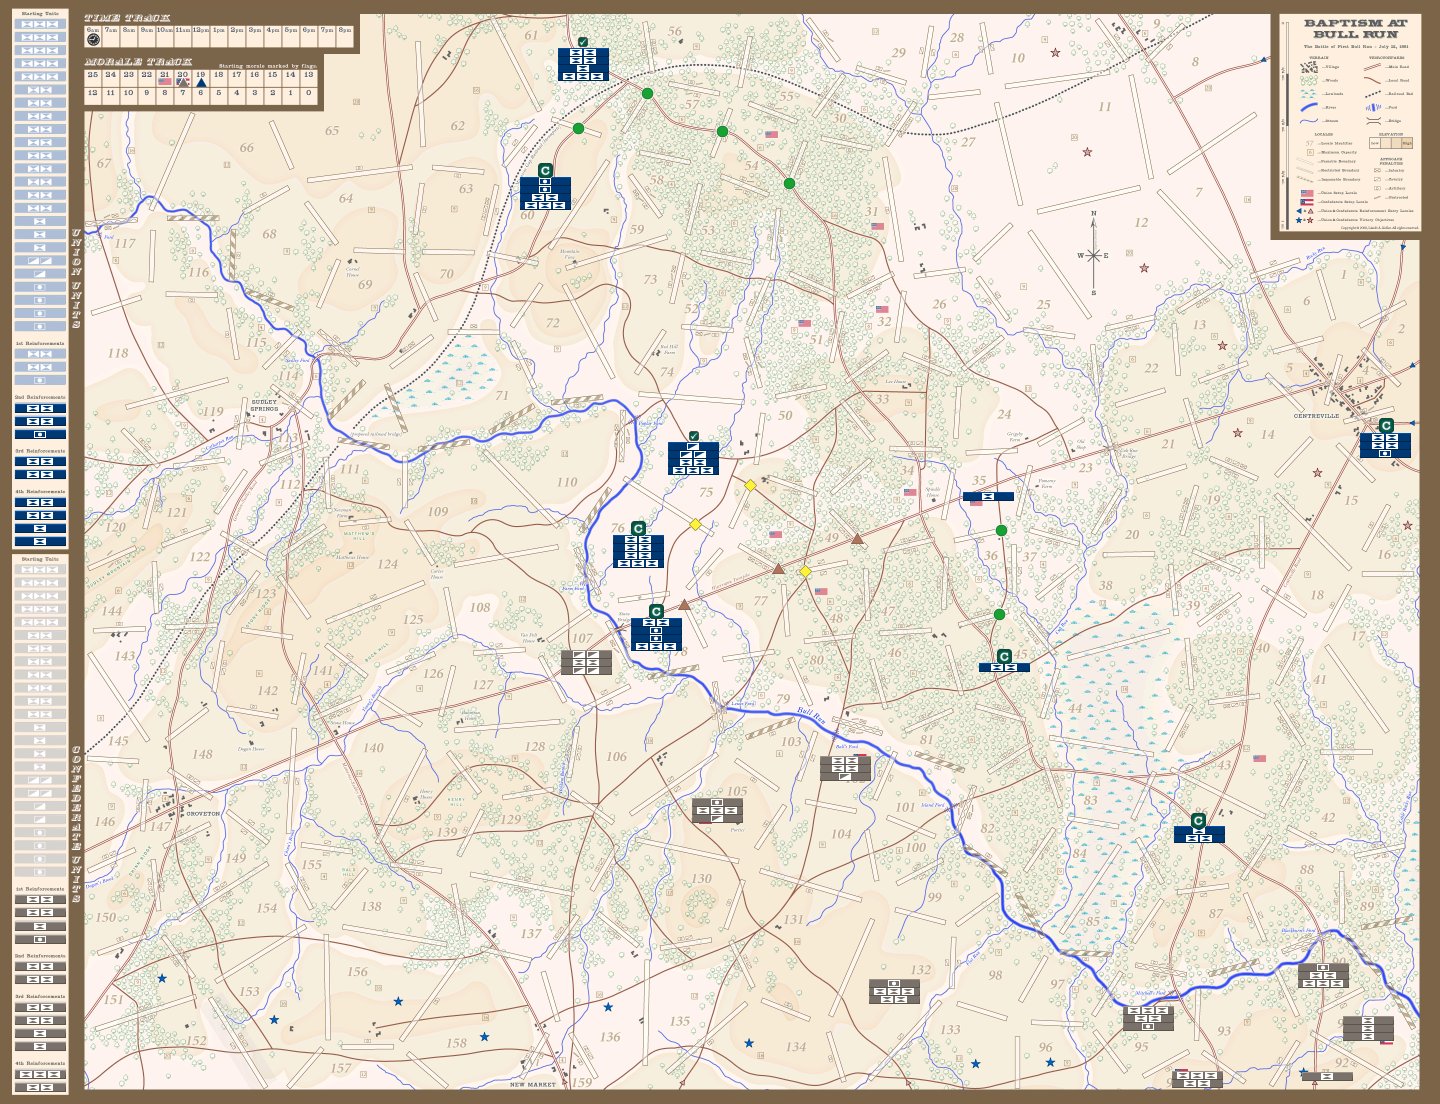
6am Confederate
Seeing those wide-open spaces from 77-over-to-88, surely got this Rebel's mouth to be salivating... The center looks particularly inviting, while his weak left appears ready to be rolled up, and pushed back all the way to Centreville.
Yet, for the cost of this expanse, the Union player surely must have some card up his sleeve. If nothing else it means that every grouping that the Union player has must be potent and strong.
Leaving 108 open was a risk, yet one that I was willing to take, given my abundance of cavalry, I would be able to threaten all four approaches if he decided to move into this locale. Being risk-active, yet cautious, I thought that bringing reinforcements on early would be a wise choice, and well worth the cost of a CP.
7am Union
I interpret the 6am massing of Confederate units at Mitchell's ford (95) as evidence that a CSA drive on Centreville is on. My moves follow NION as closely as possible but, for two reasons, 7am is the last turn NION can provide tactical guidance:
- CSA moves in NION have diverged significantly from those in MUIN, and
- Will and I got ahead of Andy and Brian in turns.

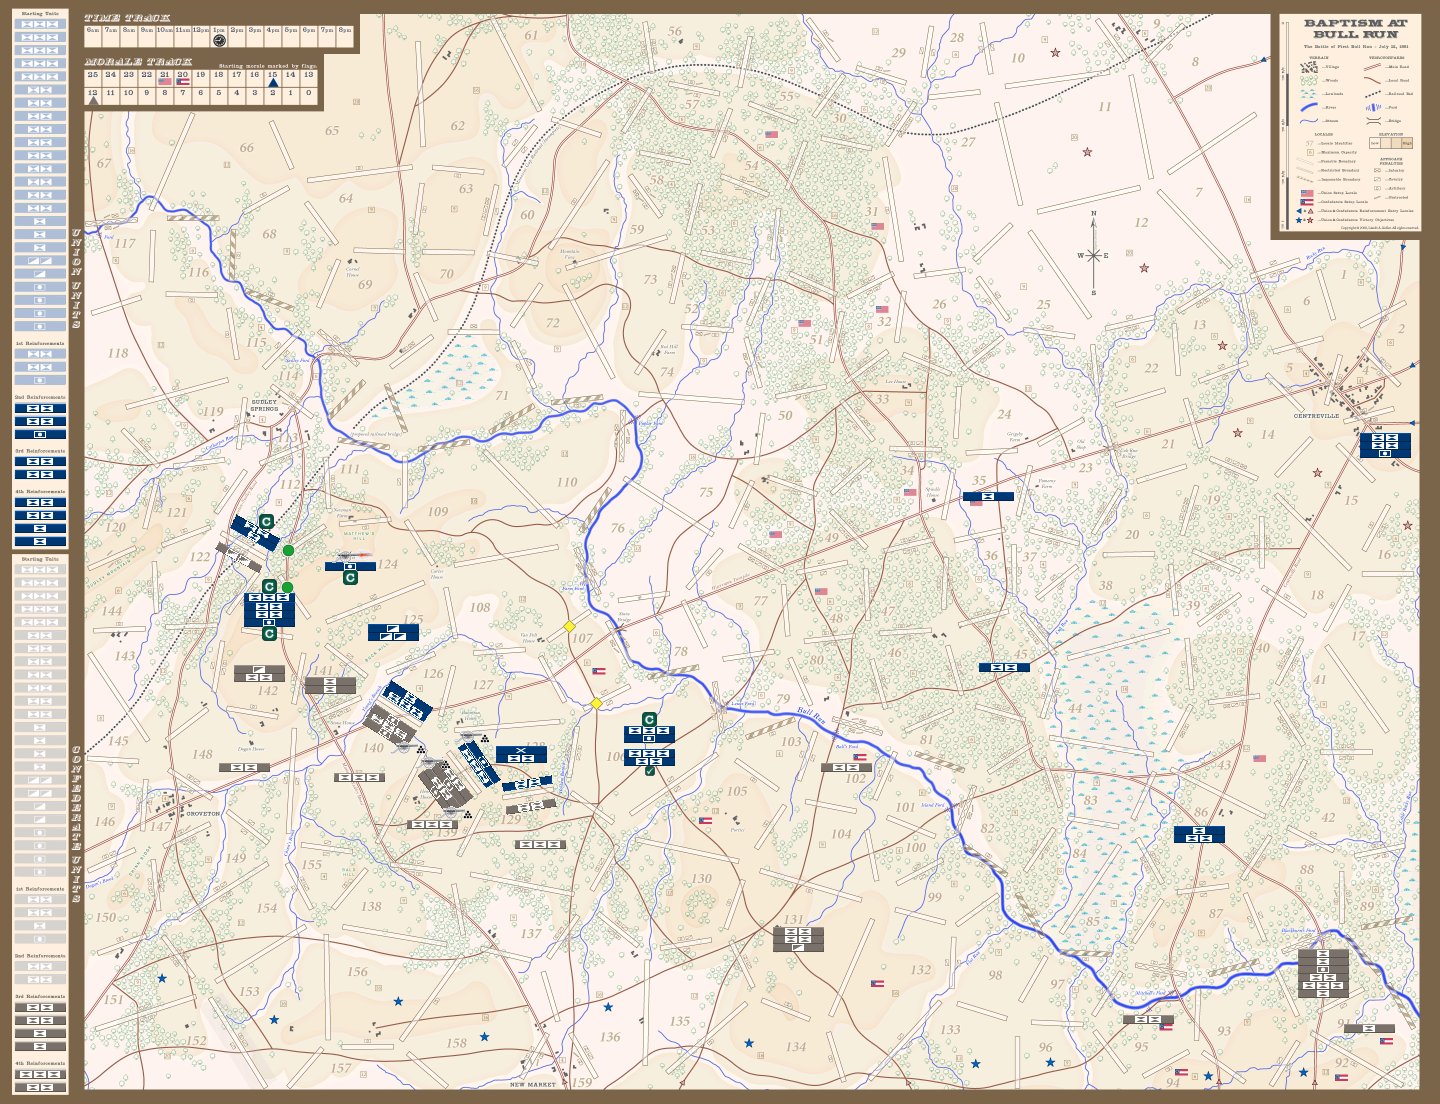
7am Confederate
With double-armed artillery guns staring at my men from across the river, I thought it was a wise time to pull back and see how he plans to unfold his attack. The need to slow him down was great, so I pulled some of his forces away from 108 with a maneuver. Moving another artillery piece up in a threatening position 106, I felt was valuable, as his forces were about to congregate, (possibly), at 107. If nothing else, it would take away his route heading south into 106.
At this point I am still playing heavily on the cautious, and defensive side of the battle, and am also wondering why Garry chose to secure to the approach at Stone Bridge—rather than maneuver. I was still uncertain about his intentions, wary, yet looking for an opportunity to exploit, if the circumstances were to present themselves.
8am Union
I'd never seen Will concede control of Stone Bridge without a fight before, so his retirement from 107 is a surprise, even though fits my expectation that a delay-left/drive-right CSA strategy is developing. I'm satisfied that, except for two units waiting to cross Sudley ford, the entire Union right wing is across Bull Run and well-concentrated.
8am Confederate
Though I fear a possible cavalry move to 141, which would split my screening cavalry command, from the core of my army, I realized that I could still seal off any possible move by reorganizing (splitting) my 2-strength cavalry unit.
With the forces that I have in place, I feel comfortable with any possible assault direction he may go. Moving into 128 is one that I think would be risky, yet combined with a 106/107 maneuver could put my forces into a difficult stretch.
Calling on more reinforcements, and shuffling, what would have been my right flank attacking wave, back toward 133, simultaneously, suddenly has my men whistling Dixie, knowing that, within the hour, they will be marching up the road toward their first taste of battle.
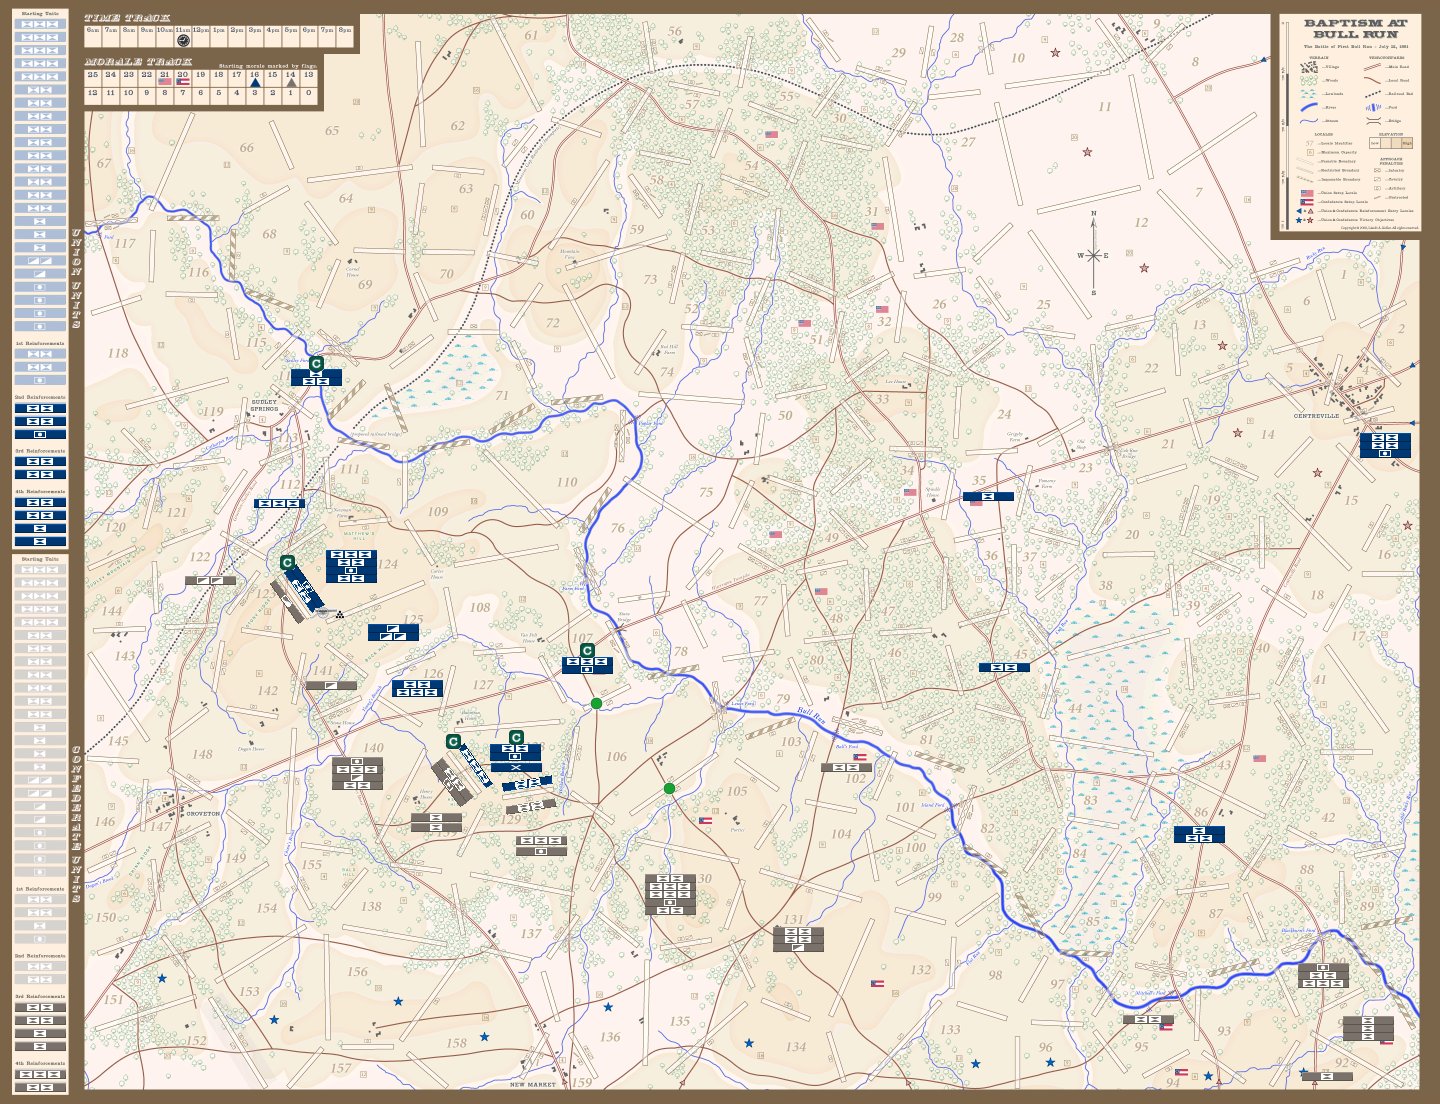
9am Union
It took three hours, but I finally realize that Will isn't fighting the battle I thought he would. The units massed at Mitchell's ford don't go north, they go west. The CSA left is going to meet the Union flankers head on.
I want to gain as much ground as possible before the lines are fixed, so I push as far forward and west as possible, including a cavalry march through the opening at 125 into 141. This requires revealing the entire Union cavalry contingent, so it's not done lightly (keeping the CSA player guessing the whereabouts of the Union cavalry imposes useful caution on CSA movement).

9am Confederate
The USA move was both bold, and risky. Hopefully, I will be able to hold off these advance moves, and begin to pick apart any weaknesses in his forces.
Again, I pull back in order to seal off his central thrust, as my suspicions of his cavalry angling for 141 were confirmed. I am pleased with my artillery being ranged, and unopposed at 139/128. With my center, at Ball's Ford (102), unthreatened, I decided to move these extra forces along into the mass, still "whistling Dixie," in order to form on the right of my line.
Up near Sudley, on the Manassas-Sudley Road my cavalry are in a good position to slow the advance of the Union forces.
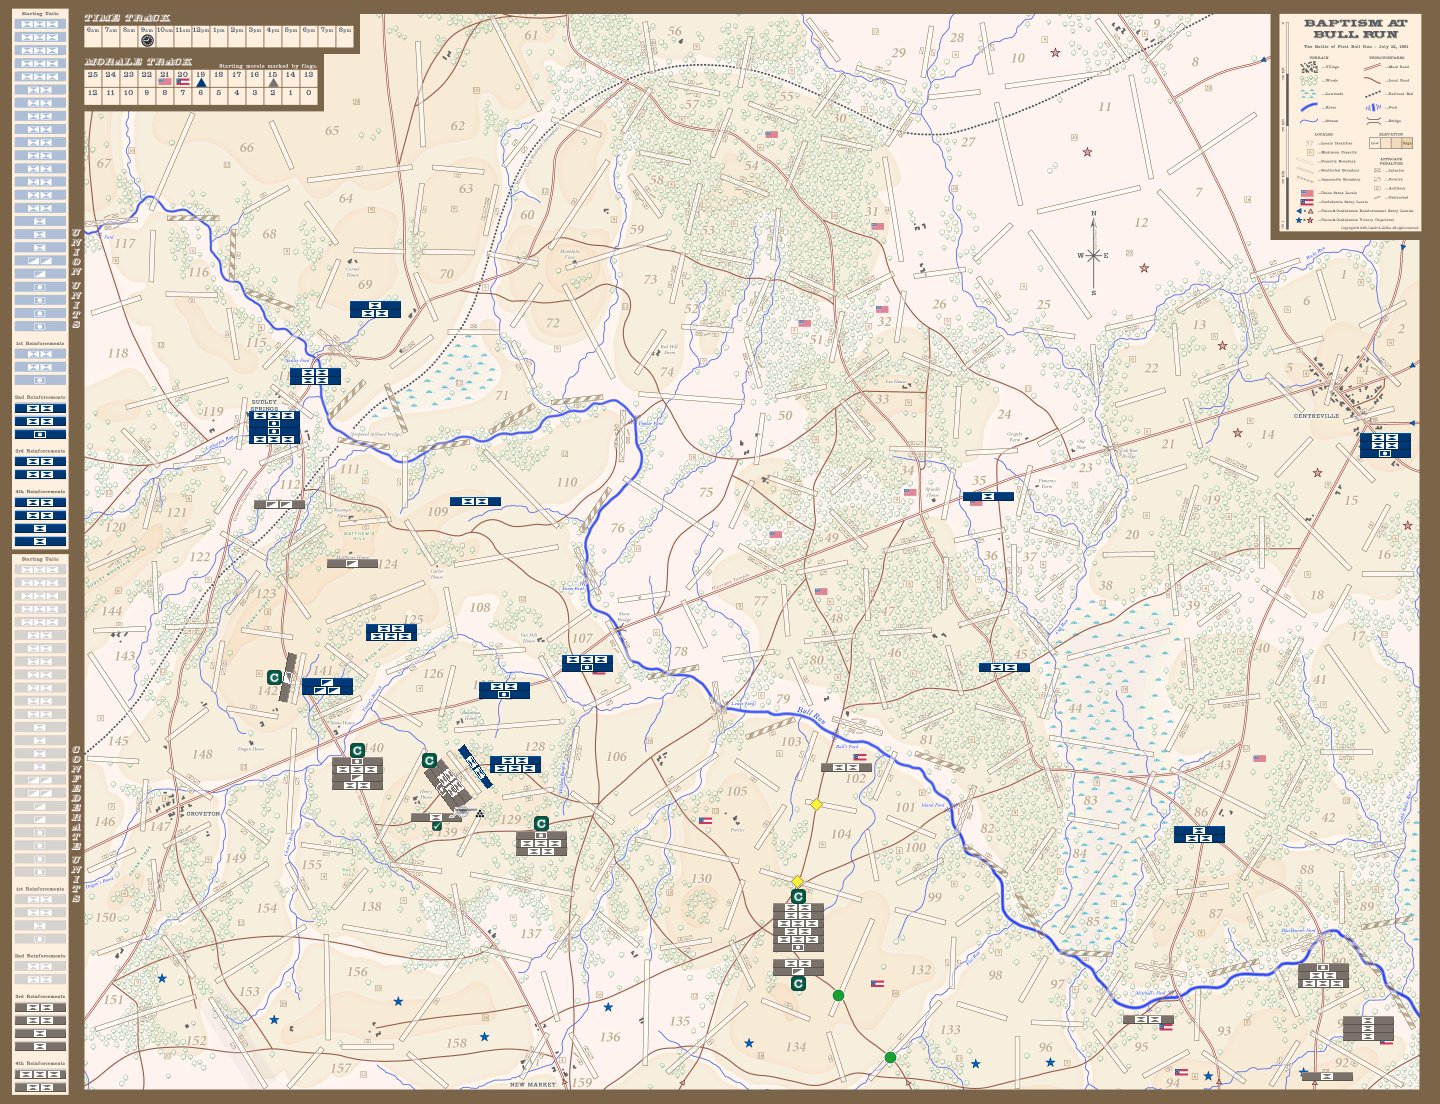
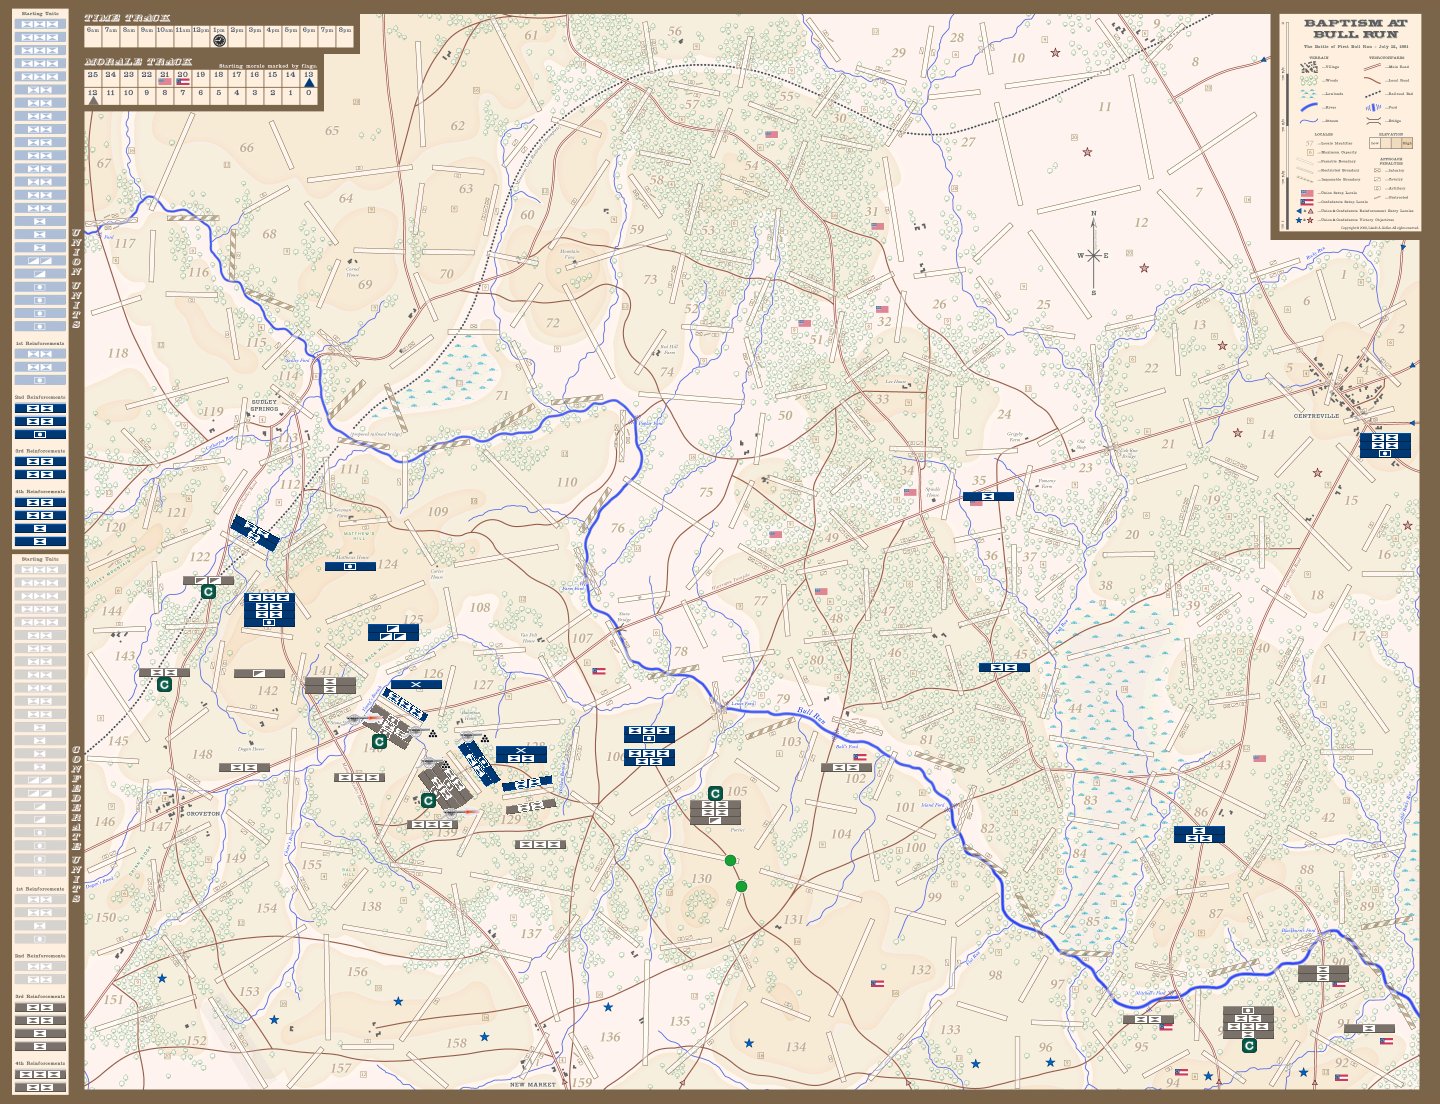
10am Union
Will's 9am has made my cavalry's cross-country gallop pointless and the CSA artillery ranging against 128 declares Will's intention to stand at Henry Hill. I spend the hour pushing back CSA cavalry screens to get my Sudley force forward.
The CSA group in 131 is ominously large and my dash to the indefensible Portici house (105) will only deny the group immediate entry into 105 should it continue north by road. I see the 131 group as posing two possible threats: it can move to 106 to complete the investment of 128 and contest control of Stone Bridge, or it can screen 130 and 104 then cross Bull Run in strength at Lewis ford (102/80). Neither prospect is appealing, but I'm more worried by the latter.
10am Confederate
The Union move shows the beginning of opportunity, yet risk. My forces at 129 are poorly manned to attend to threats at both 128 and 106. Even though I have a solid force at 131, splitting it between 130 and 104 has its own peril. 130, with its wide boundary, could be devastating, for one or the other of us.
As my moves began, I was pleased to see that he blocked at 128, yet I was surprised and elated, to see that he withdrew from 141. This allowed me to give his force at 139-128 a fretful greeting, along with an assault, which will force him to spend a command to cover that approach, or to make moves to withdraw.
Locale 130 begged for as much strength to be mustered as possible. Leaving a "holding force" at 131, I began to hope for the chance to possibly maneuver around his position at 105. With a 1-strength cavalry, moving in tandem with the two two-strength infantry units, this may just allow a devastating move, later in the morning.
11am Union
Argh. Will accelerated the 128 meat grinder by bombarding and assaulting. My Portici feint is withdrawn. Outnumbered, I don't want to become engaged in the wide approach of 105/106, so the vanguard retires to the bridge while my units in 106 join their besieged comrades in 128. The 131 group has split, but the role Will intends for them still isn't clear to me.
On my extreme right, although the CSA's 1-strength cavalry in 123 delays the Sudley force's "breakout" by blocking my maneuver, the artillery in my maneuver group ensures it's a suicide mission for the cavalry (my main force should get into 123 next turn).
11am Confederate
With his forces at 105 and 106 shifting, it allowed me to make a major road-march, that saved numerous commands, and placed more artillery at 140 and 139. By adding an additional artillery unit it would allow more devastating fire to belch into his lines. Leaving 129, with no reserves was the biggest drawback to this move.
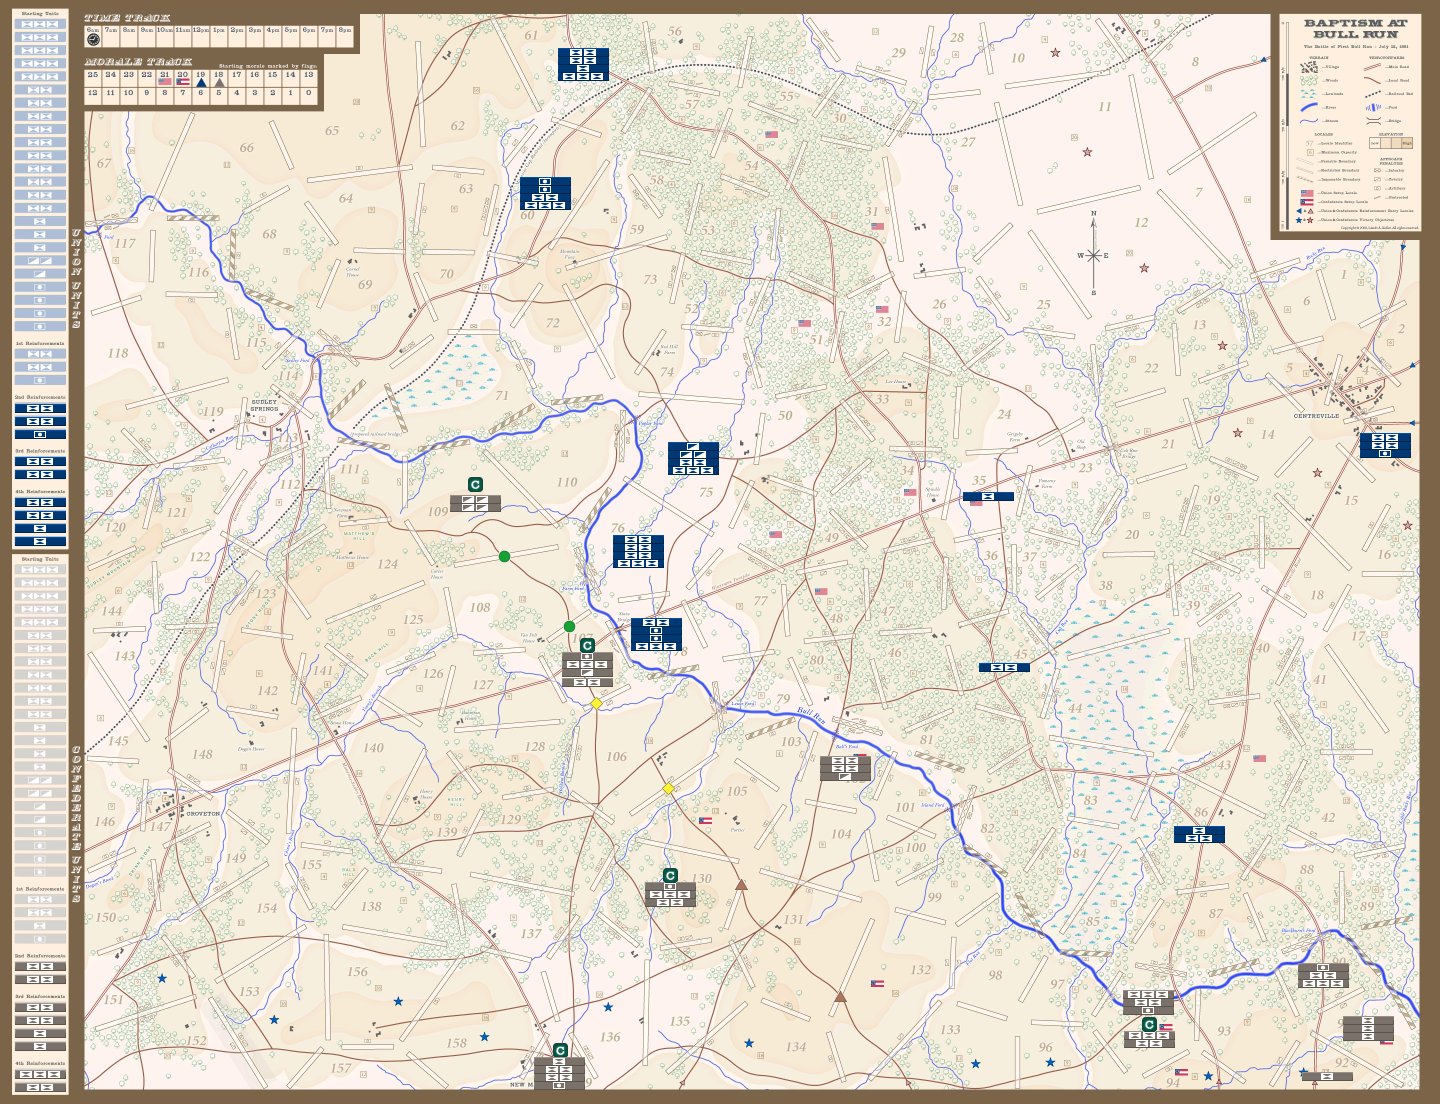
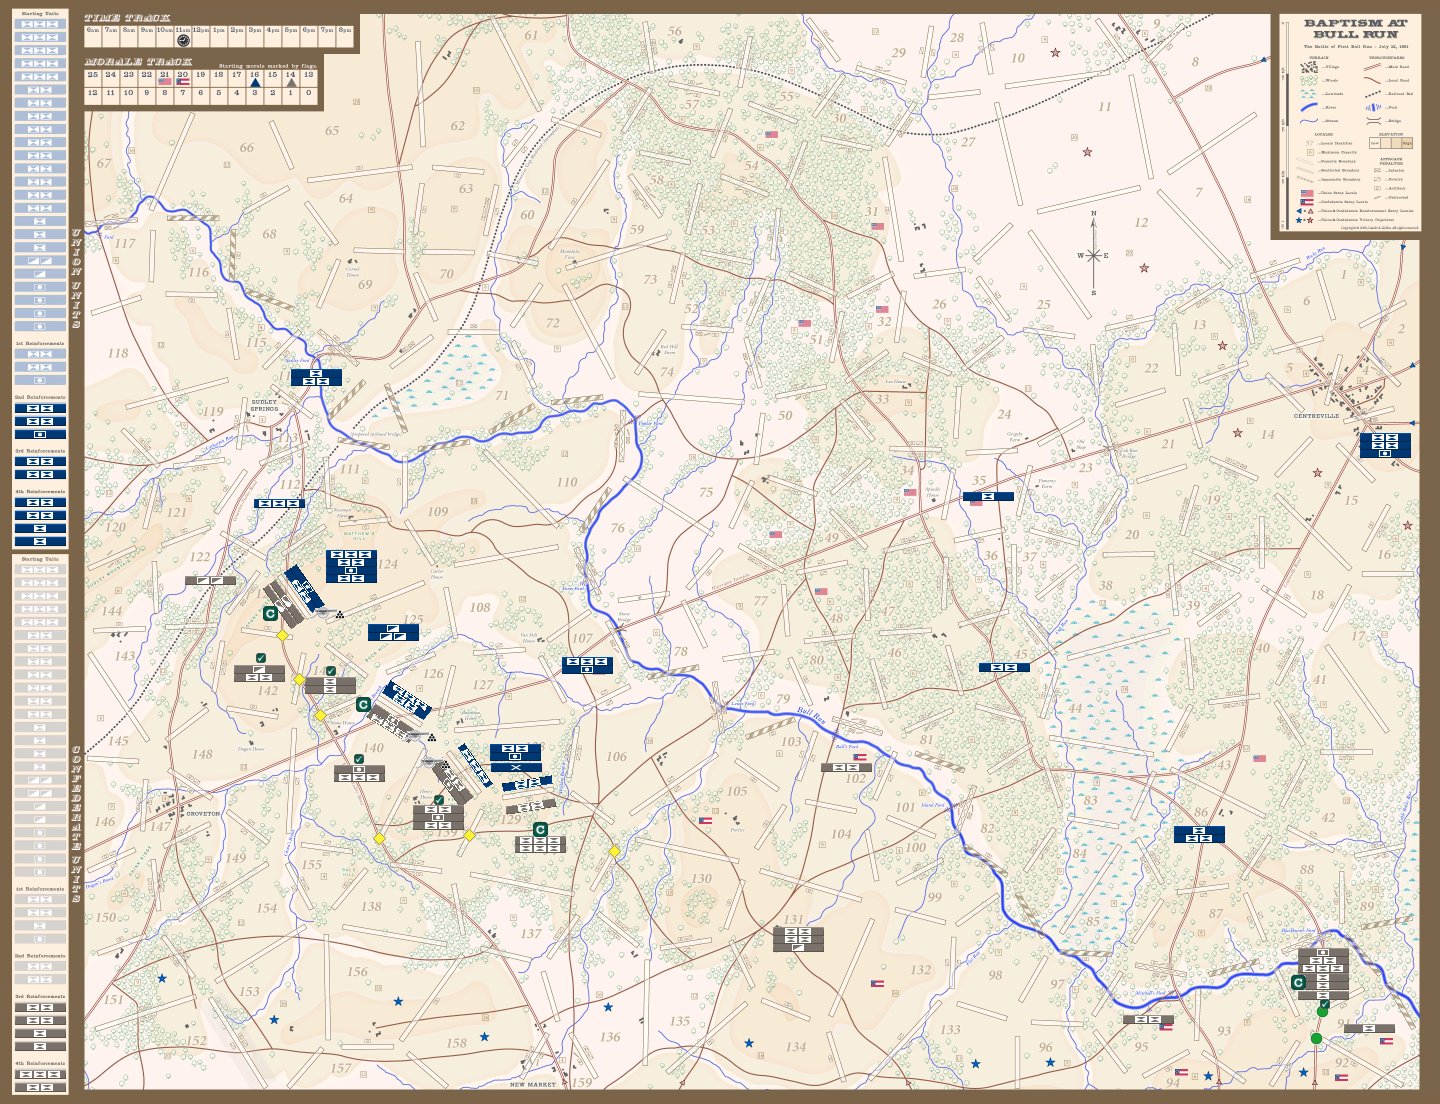
12pm Union
Cough. Didn't see that coming. The CSA's massive column march at 11am is a stunner. The Sudley force won't be getting into 123 this turn after all. And, though the CSA won't be crossing Lewis ford in strength, neither will I be making much progress with the Sudley force anytime soon. Will has retained control of the main road net and stranded the Union line across a road-less stretch of 124, 125, and 126. The last bit of bad news is that CSA artillery has turned 126 into another shooting gallery.
Union 12pm is damage control. Will's grand column march overturned my planned 12pm. The only task from my original to-do list that gets done is ranging the artillery in 128/139 to halt the CSA bombardment into 128.
12pm Confederate
Losing the cavalry unit at 123 was painful, and there surely will be another loss there in the next hour. This was needed, however, as a slowing mechanism to his movements on my left flank.
As this hour opened, I began to see the possibility of devastating his line at 126. Effectively, if I could do this, it would split his line of communications along his line, severely, which might open a door to 127, spelling the end of the battle for the day.
However, I realized that a more direct approach was needed. I decided to send a bit more muscle to 139, eventually to support an assault on 139-128, if necessary. On the right of this line, locales 105 and 106 must have looked tempting, and just the thought of his movement in this direction made me nervous.
Meanwhile, way over at 90, I have a whole host of forces sitting around, smoking, chewing the fat, playing banjo, listening to the rising crescendo of thunder to the northwest, and wondering when an order might come their way. I had wanted to send them across the Bull Run; yet more pressing concerns have forced my hand, and my commands.
1pm Union
The (now) doubled CSA artillery concentrations in 139 and 140 mean attrition will quickly vaporize my narrow morale lead, along with my unsupported infantry in 126. The only opening I see to check Fortuna's downward spin is to turn the CSA line at 129, so I march everything available into 106.
1pm Confederate
Now his force at 106 has me very worried. I have spent the past few hours moving units to support other areas of my line, and now... well, the battle has begun in earnest. I realize that I have to break through either 126, or 128. If not, he will most likely turn my flank at 129, and have a clear shot to New Market and its 'star-filled' environs.
My center, at 140 and 139, must begin to force his hand. I must break through in one of these areas, or, I fear, the day will be done. I fearfully tread up the road to 105. At this point, it has become clear that today is not the day to try to push to Centreville. I begin the slow and laborious order to push my forces at Blackburn's Ford, 90, toward the continued, and increasing roar of battle up toward Henry Hill.
2pm Union
I set up for a 3pm bombardment and assault against 129 (via 106/129). I expect to find a 2-strength infantry—or, if I'm really lucky, a 1-strength infantry—and capture 129 next turn. (Had I maneuvered instead, I would've known, when Will blocked and revealed the 3-strength infantry, that the assault next turn was doomed.)

2pm Confederate
My far left was now giving way, so I had to make it hazardous for him to continue his advance there. Retreating north of his advance allows me some comfort, as I can now begin to draw him away from his desired direction, (if needed). I also moved units, essentially daring him to move into 148. Though my units were not strong overall, I imagined that he would think twice about moving into a locale where each of his units could be drawn onto four distinct approaches.
However, the most pressing place along the line was 129/106. Here, I knew that if he hit me with his artillery, then assaulted, and moved more units up onto the approach, he could, with another 3-strength unit take this locale, and break my line into tatters.
The brightest point along the battle line was that locale 126 was a single hour away from possible destruction. If 126 were to go, 127 would follow, then 128 would be the last domino in the play, or opera, and the fat lady, at that point would come out singing. (If only the first domino...)
3pm Union
Will's 2pm cavalry march and deployment in 129/106 upsets what I had (incorrectly) assumed would be a sure thing. I hope the cavalry move is evidence that the approach is secured by a 1-strength cavalry and a 1-strength infantry. If the facedown CSA unit is 2-strength infantry, it will take me another hour and another assault to capture 129. But, with my center in 126 bleeding-out, I have to go now. And so I am the last to learn that my assault will hit not a 1-, not a 2-, but a 3-strength infantry.
For me, the war is over. Union chances of a eking out a narrow win have gone from very small to none at all. With the battle lost, I'll try to at least pull off an orderly disengagement. (I am still aiming too high.)

3pm Confederate
At the moment of his assault into 129, from 106, I didn't know it, but that was the turning point in the battle. Though my successful defense held, I knew that with another concerted effort with the combined arm of the artillery that my line would not be able to hold.
The day was on, and morale was a pressing concern for both sides. With this turn, I knew I had to hit, and see how close to breaking him I could come without, doing so to my own troops in the process.
Locale 126 with a brave assault was mine! Then a courageous assault on an untended battery took away his last bastion of fighting power on his left flank. This dropped his morale to a fleeting whisper. My right was spent at this point. The heroic push of this lone unit was euphoric and hollow at the same time. With his next sequence he could easily counterattack and decimate these brave soldiers.
4pm Union
With my center in 126 not only crushed but captured (CSA 3-strength infantry seem to be everywhere) the Federals begin the long walk back to Washington. The one-point morale boost provided by the rally in 128 will, I hope, buy the Union army enough time to complete its disengagement.
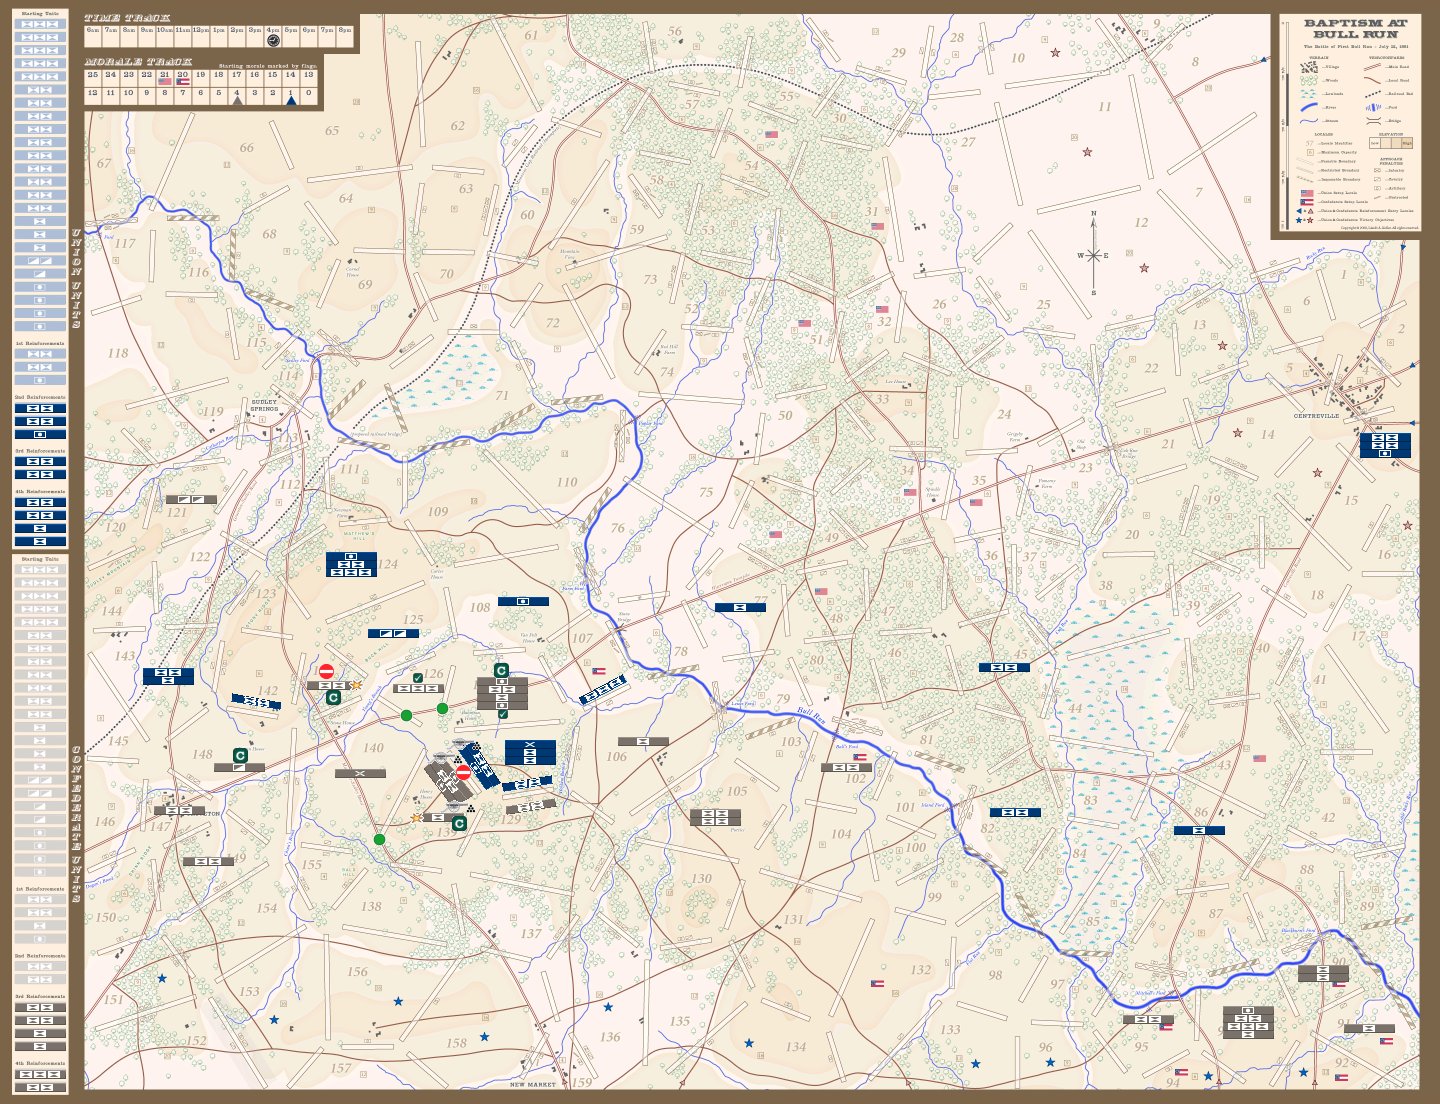
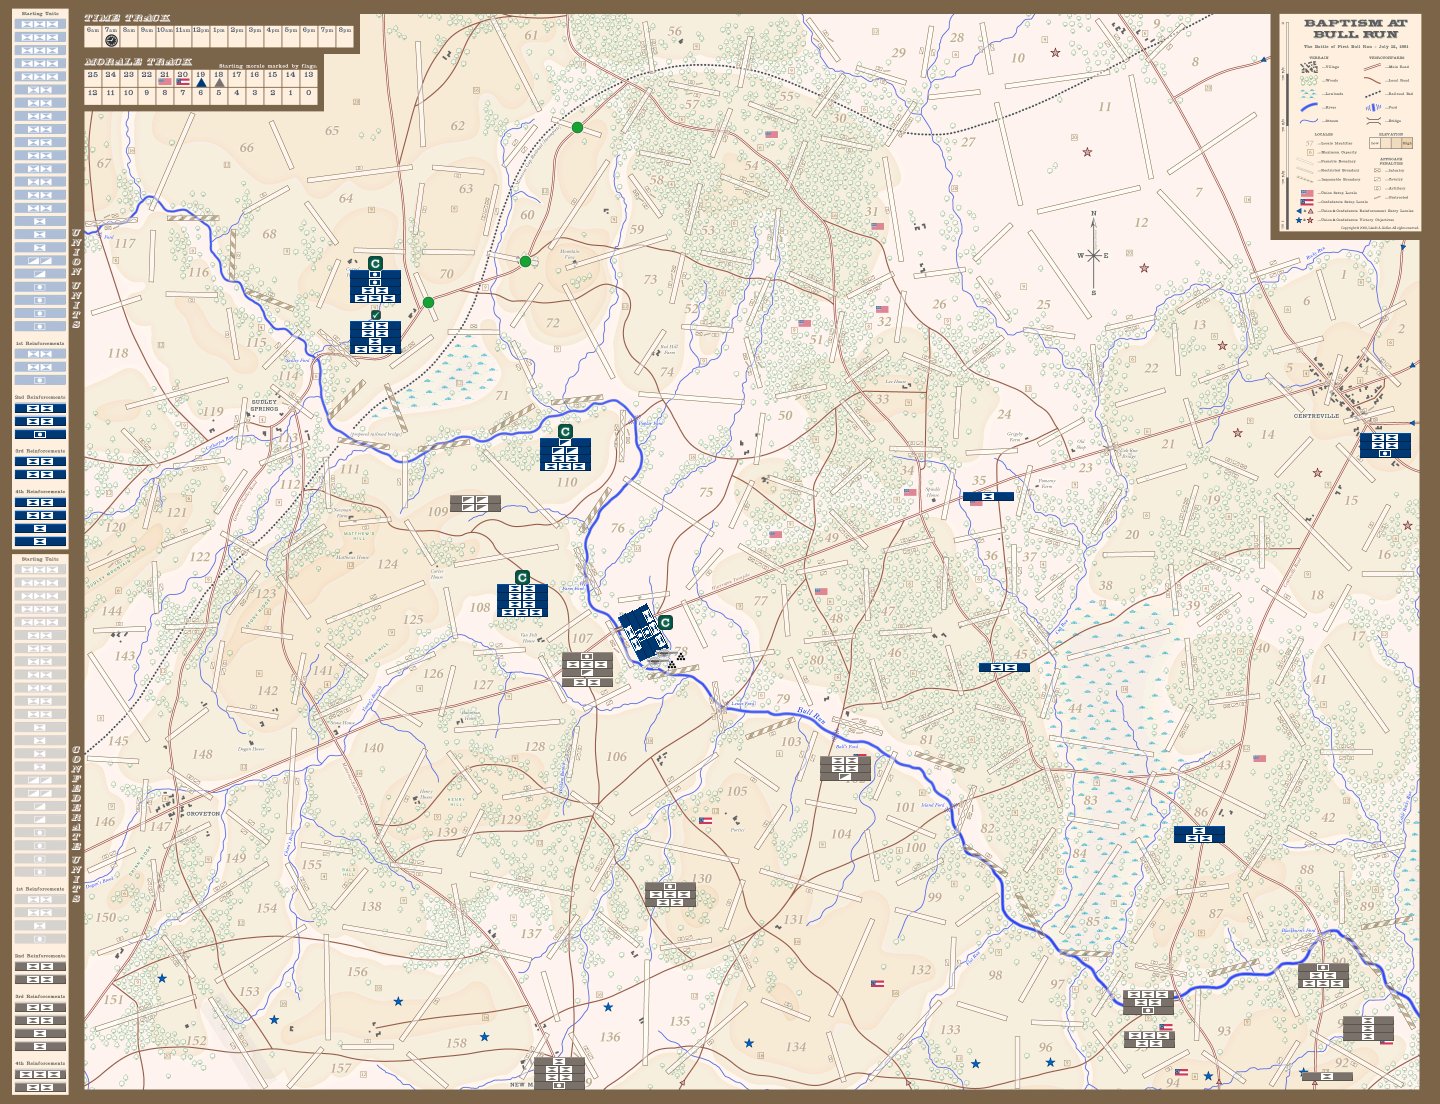
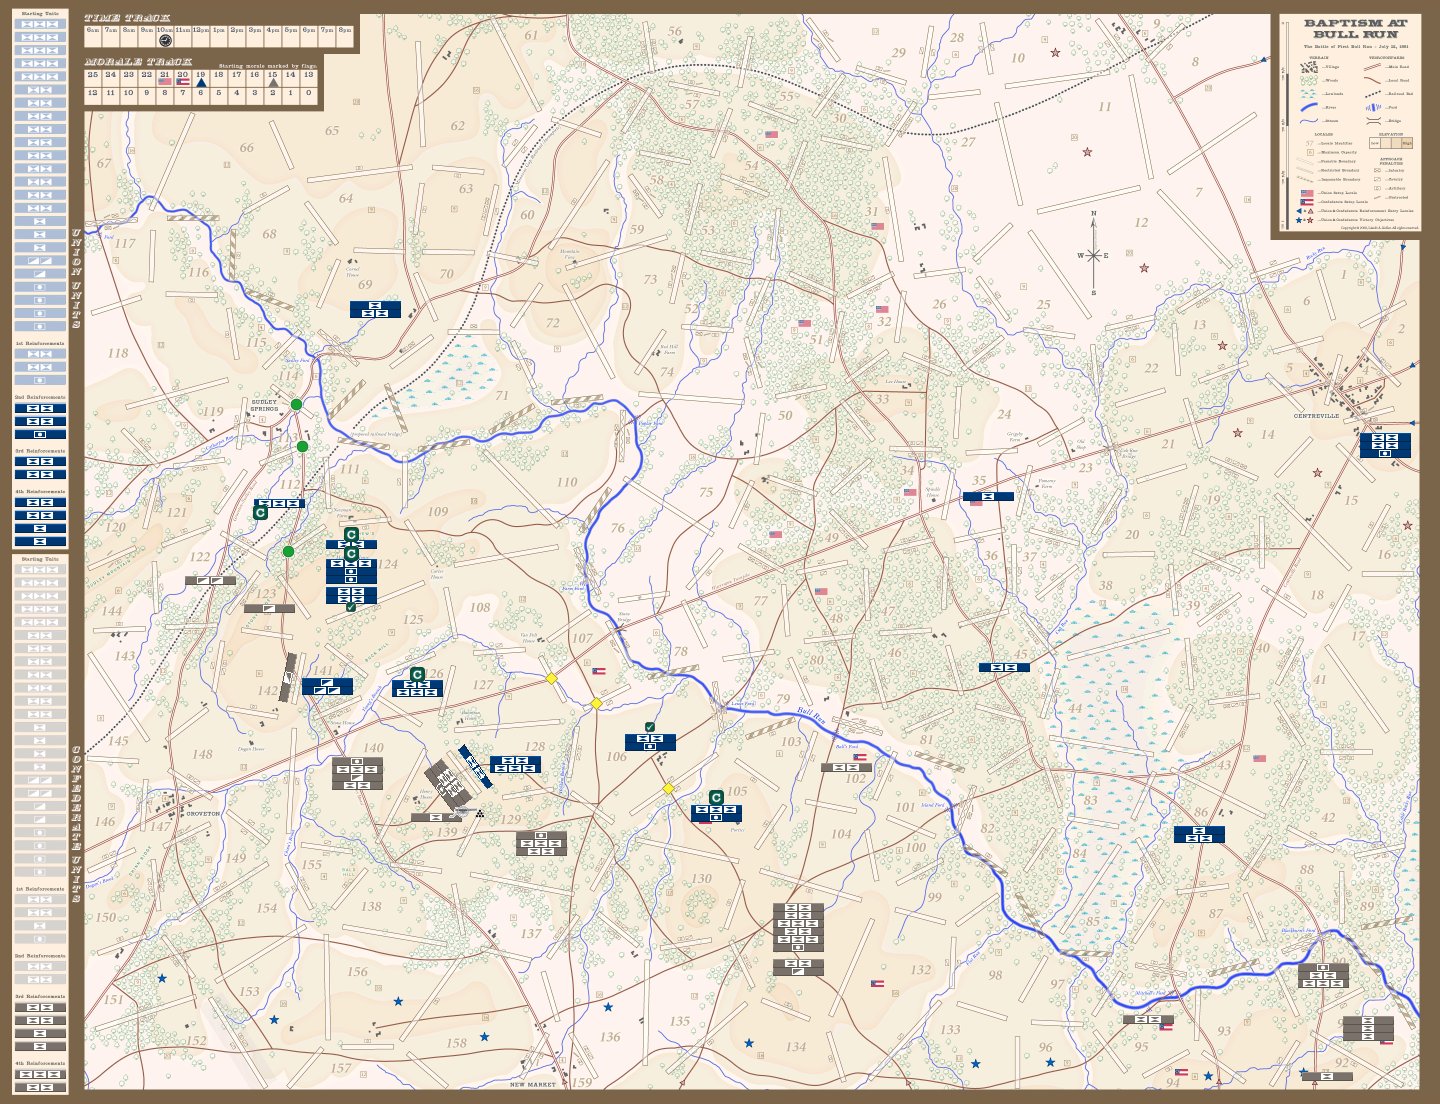
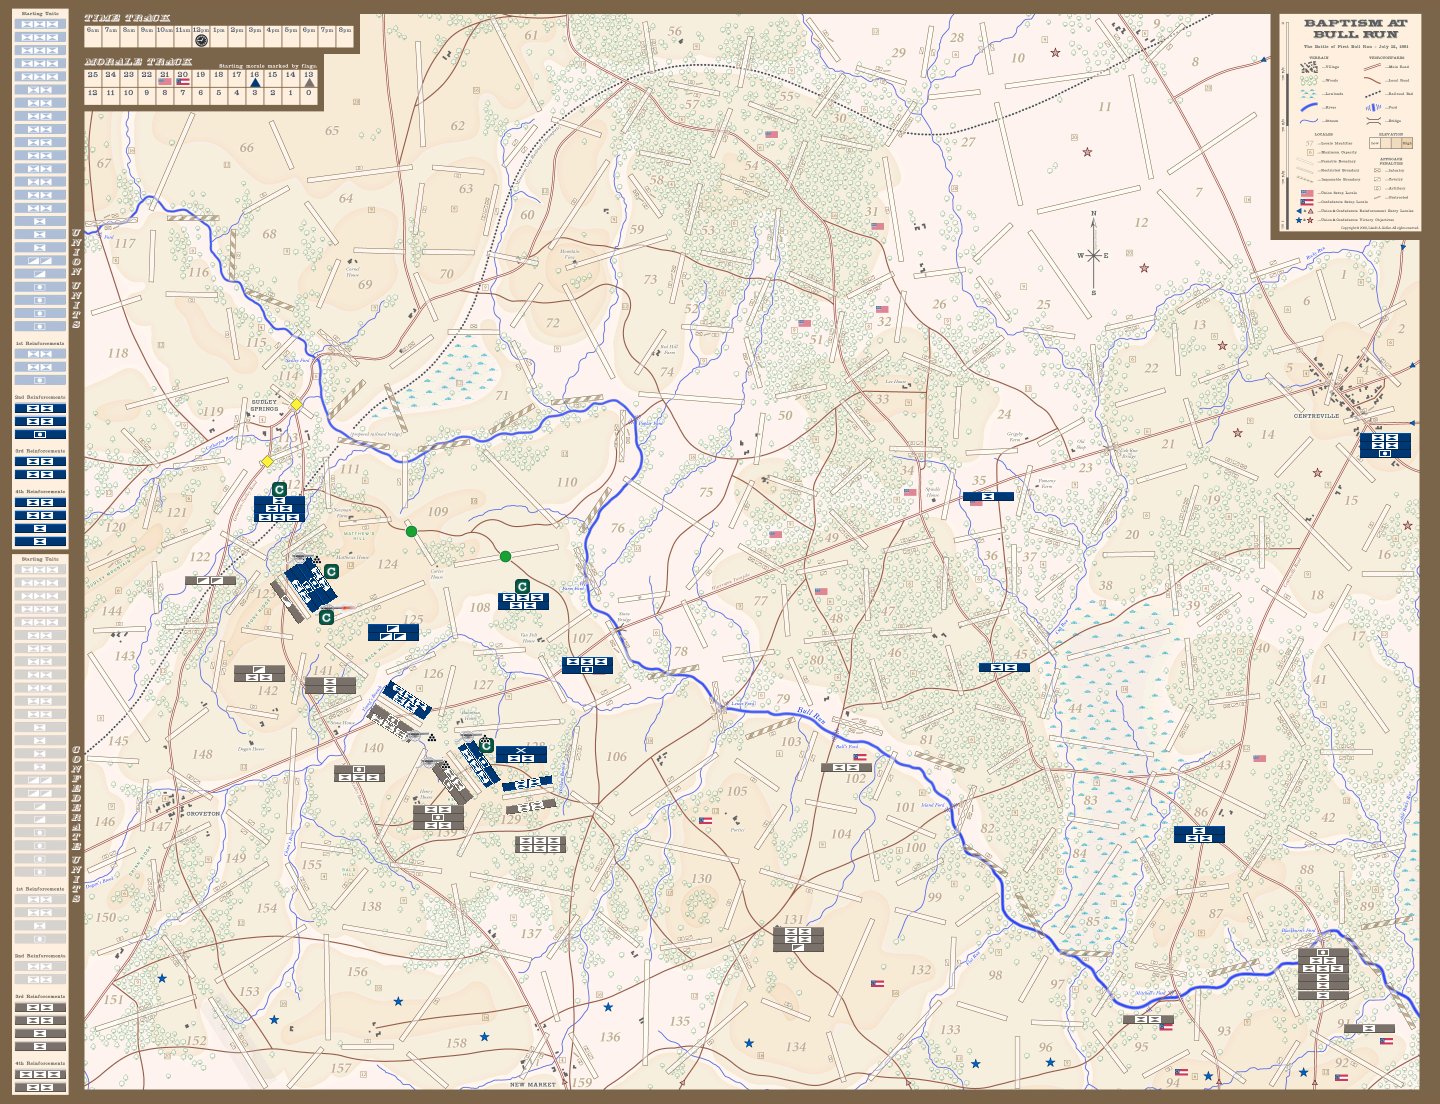
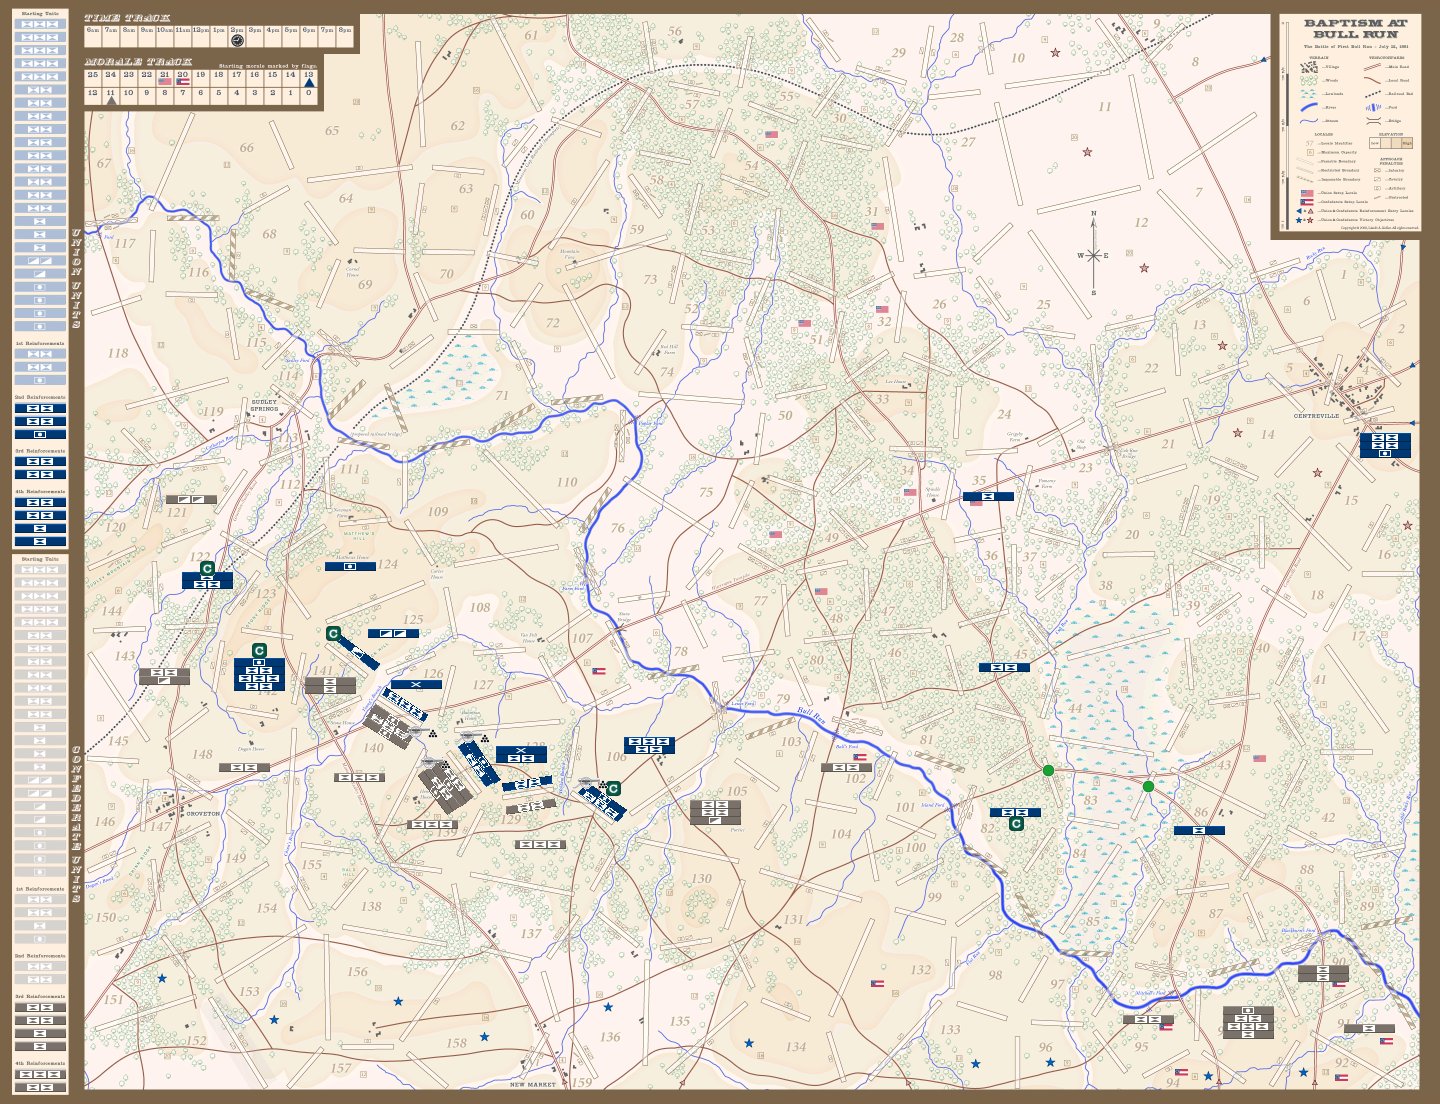
4pm Confederate
With this last move I wanted to be certain to push and work to drop his morale as low as possible, knowing that on the next turn with a single artillery blast I could reduce the US morale to naught.
Taking 127, and making a road march with the command, allowed me to block any potential cavalry moves that might make a mess of my line. Taking 141 was a risk, yet one that I knew I could afford, as the cavalry unit at 148 could always come in to support, if needed. His locale at 142 was in jeopardy and he would have to spend CPs in order to solidify that position.
If this proved unnecessary, or if the need arose, I would be able to move the cavalry unit from 148 to 127 and support either of the 127/108 or the 127/107 approaches.
Fortunately, neither situation became necessary as he handed his sword over as his troops fled the field, in a race to return to Washington City. Henry Hill, on this day was the place we made our stand, and like it was 147 years ago, "Stonewall" Jackson earned his name and a solid place in the history of the making of this country.
Union Aftermath
The end... or so we thought. In actual play, we inadvertently reduced the Union morale by two for the CSA's winning assault against my 1-strength cavalry in 141/140 and demoralized the Union army. However, as the cavalry was eliminated by the assault, we shouldn't have applied the -1 retreat penalty. So the 4pm Union demoralization was an error, though a trivial one since the Union army's fate would've been sealed at 5pm anyway.
The CSA column march into 127, isolating my longsuffering units in 128, was utterly demoralizing—and I mean that without reference to the morale track. I'm not sure why I passed up the obvious move to secure 127 at 4pm with a cavalry march from 125. If I'd thought 127 was too "hot" for the two CSA units in 126 to enter alone, I clearly failed to consider the roads that still knit the CSA center together—a peculiar oversight given the fact I was fighting Will "Column March" Green.
Playtest Game MUIN: 4pm Confederate (end-of-game)
Union Summary
This game certainly allayed our concerns that a Union "Schlieffen Plan" might represent an ideal US strategy. It didn't. At least not with me running the Union army.
What went wrong? Well, as if my complete misreading of Will's strategic intentions and force allocation weren't enough, Will consistently played a superior tactical game throughout. The replay makes that clear. His guns and 3-strength infantry were always where it counted most and he repeatedly managed the very difficult (and unexpected) feat of defending by attacking. Any hopes the Federals had to snatch victory from the jaws of defeat were dashed by the Rebels constantly kicking them in the teeth. A very instructive thrashing!
Confederate Summary
I imagined, from the intentional Union setup, that everything, including the kitchen sink, was going to be pushed into the center, and then he would commit a sustained effort to breakout, or through, my lines in order to wreak my lines and/or, catch a star, or two. Garry's approach had always been very thorough, and somewhat cautious. This I took into account yet imagined that he would approach this battle somewhat differently.
My initial concept was to sit back and watch his battle plan unfold, and not try to hinder it, only slow it down, if and where it might be possible. Then once his intentions were clear, and I could get a good grasp of his main push, I would begin to chip away, find his weakness and exploit it. The "soft left wing" that he presented to me, did have its temptations, yet I knew that if I moved toward Centreville, it would require more men, and more CPs, both of which would, most likely, be necessary for reinforcing the center.
Though the Confederates won on this day, it truly was a "close run thing," that could have gone either way, with even the slightest of shifts in troop disposition. Had I moved against Centreville, with all my might, it may have shifted the entire focus of battle to the other side of the Bull Run. Then the Union would have had to set up a defense of Centreville rather than having the Confederates maintain a determined defense of Henry Hill. In the end, it was a tense, fun game.
Last Updated: 2009-01-18 18:45 EST
For questions and/or feedback, please send e-mail to: baptismatbullrun@....com (Click the hyperlink to reveal the e-mail address.)
Further discussion about Baptism at Bull Run can be found at either of these game hobbyist websites: BoardGameGeek ConsimWorld